Tuesday, December 13, 2011

$1 Store Mop = Stick Horse

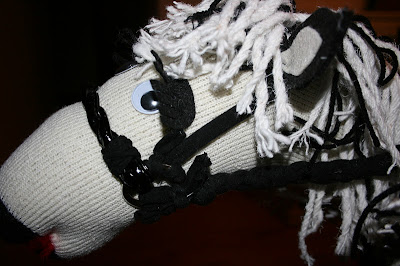
My little "cowpokes" love horses, and since stick horses eat a lot less and make much less mess :) I decided to try my hand at making some for Christmas!!  We'll leave the real thing at Grampa's house :)
I didn't have any old broom handles or dowels so I thought a dollar store mop might be the perfect material not only for the stick but also the mane and this is what I came up with! 
It was a pretty easy project and I think my kiddos are going to LOVE them :)
This is how I did it.
I took the mop end off of the metal handle and pooped off the plastic so the strands were loose. I also spray painted the "stick" black.  You could leave it white, but my sock is off white and black and I thought the black would look better.  Plus, these days I never turn down an opportunity to spray paint something.  Maybe it's that inner teenage rebel that never surfaced.. who knows :)  But, I had it on hand so I sprayed the metal handle black.
For the head I used a thick mens sock and stuffed it as full as I could with pillow stuffing.
Now for the mane, I measured the length of the individual mop pieces and then cut an equal number of pieces of black yarn the same length.  Using a large needle and going down the center of what would be the back of the sock I used the yarn to attach the doubled over mop strand.
A double knot secures it nice and tight.
My mop had about 60 strands so I ended up doing two rows of the mane starting at where the heel is on the sock and going down to where the top begins. You could just do one row, but I had the material and liked not only the two color mane but also how thick it is so I did two.
For the front I did the same thing, just cut the mop strands and yarn in half so that they don't cover the eyes once they are on.  Basically, you want to now go the opposite direction of your other rows and cover where the heel would have been on your sock.
This is is what it looked like with all the strands attached.
Nice and thick :)
This is the point where I attached the handle.  I decided to flip the handle around and use the end that would normally have been the exposed end on the mop and put that inside the sock.  On my mop, the end that was attached to the mop head had a nice plastic end the other end did not so I figured the plastic end would probably be a little gentler on my floors :) Once the handles was all the way up to the heel portion of the sock I liberally applied glue all around the handle near the bottom of the sock..(which actually used to be the top).
Then wrap the sock tightly around the glue and handle.  I used some extra black yarn and wrapped it around the handle to finish it off and give it some extra support.
Now the personality :)  I used these google eyes also from the dollar store for the eyes and the little ones for the nose.  Just a little glue and already these critters are starting to come to life ;)
For the mouth I threaded a piece of red yarn through the sock and around, tying it off at the corners.
The eye lashes and ears are just pieces of felt that I cut and then hand sewed on with a few stitches.  It's hard to see in these pictures... (sorry about that), but I layered black and off-white felt and then pinched the bottom together and put a stitch through it before sewing it to the head so the ears would stand up better and look more realistic.
The bridle came from this old purse of mine that had ripped. I used the straps and rings from the handles to make the bridle.
And the reins are an old pair of yoga pants that I cut into strips, quickly braided and then tied to the rings on the bridle.
Pretty fun for a few bucks :)  I made two.. one for each kiddo in an night. Like my other recent projects, these are tucked away waiting for Santa.  Once again the chubby guy gets all the credit!!!  Funny how that works :)

UPDATE:
Now almost a year since I made these my kids still love and play with them, but we did just have one of the sticks get bent during a rather rambunctious ride, so if your kiddos are bigger or rowdy like mine you may want to reinforce the thin metal handle of the dollar store mop with some tape.  I used black electrical taped wrapped around the full length, this would also skip the painting step.. bonus :) You could also follow the head technique above using a dollar store mop, but substitute the handle for a wooden dowel from Home Depot or Lowes... just ideas!

Happy Trails, Lindsey :)

Thursday, December 8, 2011

Thrifted Crib Sides = Chalkboard and Dry Erase Art Station !!!

I had planned to just wait until our littlest munchkin was out of her crib to make one of these crib side chalkboards, but when I saw these crib side at a thrift store recently my impatience got the best of me!!!  These were missing the rails and some of the hardware so they were a whopping $4, which was perfect for me because I didn't need those pieces.  
Once I got these beauties home I took off the hardware that was on it, filled those holes, sanded everything and then painted it all this great bright red.
Then I taped off the one side I wanted to be a chalkboard and sprayed on three coats of chalkboard paint.
You could do chalkboard paint on both side, but I wanted to make mine a little different and decided to make this an art station... one side chalk one side dry erase.  So I found this large magnetic dry erase board at Walmart for around $6 and used the adhesive pads that came with it to stick it to the other crib side.
Next I added two hinges to the top.
Then I used inexpensive cup hooks and some chain on each side for a little more stability.
For trays I took dollar store wire utensil baskets and spray painted them red, then used adhesive hooks to attach to the board on both sides.
Since the dry erase board is also magnetic I used a few left-over magnets and glued those to the back of the other eraser just to help keep track of it.  I know with my two little artists... this stuff will likely go "missing" not long after they get it  :)
It was a pretty simple project and I'm really happy with the way it turned out!
I think the kids are really going to love it.
I love that there are two different sides, one for each kid and if they get bored they can trade sides and thanks to the magnets they could also color on paper as well :)  Plus, it folds flat and can be leaned against a wall or in a closet when they aren't using it to save space.
Sorry no "artist in action" photos just yet!  For now this is hiding in my laundry room waiting for Santa :)  Hope you like my latest late night project.  If you decide to try one, let me know what you come up with!

Good Luck, Lindsey :)

Wednesday, December 7, 2011

Tile Photo Coasters = Gift Idea

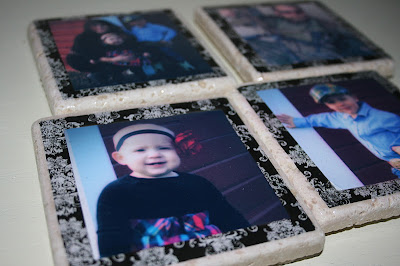
I bought this bottle of Mod Podge several weeks ago, determined to finally give this whole craze a try.  People that love the stuff swear it is AMAZING!  Evidently you can use it to glue/seal almost anything to anything! I really want to try fabric on a dresser or inside drawers.. but I'm starting with "baby steps"!  So I decided to try what looked like a relatively simple gift idea... the photo coaster.  To my surprise it was really easy and I think I'm a Mod Podge convert :)  This is how I did it.
These rough tiles come in a pack of 9.. not really sure why 9 but that's how they come and you can find them at your local home improvement store for under $4.  Home Depot, which is where I got mine also had smooth, glossy colored tiles.  I liked these the best for my project, but the other options are out there :)
First off I traced the tile onto a piece of scrapbook paper and then cut out four of those about a 1/4 inch inside the line.
I wanted to have a layered look, so you could see a little tile a little pattern and then the photo. So I then cut my photos out a little bit smaller than the paper.  Isn't my little man the cutest??? 
OK back to work :)
 Now you get to gluing!  I used a small disposable foam painting brush to put down a layer of Mod Podge then put down the paper and another layer of glue.  I let that set for about 15 minutes.
Then some more glue and the picture.  Let it set and more glue over it all.
Then another coat!  It sounds tedious, but it's really not bad I did this while doing about 7 billion other things and they turned out great.  The directions say to do 5-6 coats to seal something.  I did 6 and once the final coat was completely dry I did wet down a piece of fine sand paper and smooth out the ridges that form just to make it smooth.  Now since these are coaster I did give all four one coat of clear spray paint to seal everything.  I guess Mod Podge does not like wet or heat so drinks on top could be a problem if you left off this step.
Finally I used these dollar store self adhesive felt pads.
Stuck one in each corner and you're done.  I really is as easy as everyone says :)
A set of four is a nice personal gift for anyone on your list this holiday.
Good Luck, Lindsey :)

Tuesday, December 6, 2011

$5 Coffee Table = Bench

For the last few weeks on Pinterest I've seen several coffee tables turned into benches and I really love the idea.  So I've been on the hunt for a coffee table to try my hand at it too and this is what I found.
It had a few cracks, but it's solid wood and I liked the shape.
Plus, dust and it all it cost a whopping $5 at my local thrift store... so here I am knee deep in yet another project :)
First I used some wood filler to fill the crack.  I let that dry and then sanded the cracks and the rest of the table.
Next it got two coats of my new favorite spray paint.
Then instead of sanding the edges I decided to go for a more paint chipped look and used a paint stripping pad.. (you could also use steel wool) and started rubbing away.
See it is kind of a neat effect.  I did all the edges...
and the legs.
Now for the cushion.  If you haven't checked before.. foam is expensive and since I only paid $5 dollars for the table I didn't want to spend $30 on the cushion.. that would kind of defeat the idea!  So I went looking for alternatives and decided to try using a twin sized foam mattress topper from Walmart.  It cost $8 and I just folded it in half to make it twice as thick and cut off the excess.  Then using a little spray adhesive I layered on quilt batting and wrapped it around the edges.  This adds a little extra cushion and softens the harsh edges of the foam so it looks a little more professional.  Then I used some scrap fabric I had (black linen) and some more spray adhesive to stick it to the batting and foam. Next I just carefully gathered and tucked the corners under until it looked right to me.  I am no expert so there is probably a better more efficient way, this is just how I did it and it worked O.K. :)
Finally I used a button cover kit that cost all of $1.48 and some scrap pieces of fabric to do three buttons and then hand sewed them through the cushion, pulling tight to make it indented a little.  I assumed covering buttons was hard.. wow was I wrong!  So easy.. cut a circle of fabric.. put it in the holder.. add the button provided.. tuck in the fabric and push on the back of the button.  Presto-Chango you are done :)  Pretty nifty huh?!?
Last thing I glued the cushion to the top of the table and lugged it inside to it's new home at the foot of my bed!
Ta-Da!!!
I really like it with my new bedding and my turquoise lamp!
Not to bad for a small investment and a few hours of work!
Oh who am I kidding.. the hardest part was letting the paint dry :)  Which is my kind of project!
Hope you like my latest creation, if you do get out there and find a coffee table... TODAY!

Happy Hunting, Lindsey