Monday, February 27, 2012

Heart Cupcakes .. Not Just For Valentine's :)

I have to admit... I had intended to post this for Valentine's Week, but I am going to blame complete family bliss for the unanticipated blogging hiatus.  Having "Rambo" home safe is so amazing, but I told him he's really cutting into my creative time :) Haha! That being said these heart cupcakes were a major hit with everyone and they are so darn cute there is NO reason not to make them more than once a year.  So this is how I did it :)
I wanted these to be quick and easy, but still special so I decided to try layering strawberry cake and fudge brownie for my little take on a chocolate covered strawberry.  To do this you will need a strawberry cake mix and a brownie mix, frosting, sprinkles to decorate and marbles to make your hearts come to life.
First make the two mixes according to their package instructions in separate bowls.
Now scoop a small spoon full of whichever batter you want on the bottom into your cupcake liners then cover with a spoon full of the other.  I did some starting with the strawberry and some with the brownie just to mix it up.  Be careful not to add too much batter!!! It may seem stingy, but I would try to keep the cups only about half full because they rise quite a bit and the marble is going to take up even more space.  I over-filled my first batch and they lost the fun heart shape when it oozed over the sides :(
Now for the sweet shape.  For this you need marbles, I found a small bag for $1 in the toy section at Walmart.  Push one marble all the way into the bottom of each cup in between the liner and the tin.
 Once all your marbles are in, hopefully you still have a few left in you noggin :) 
Bake according to your package directions.  Mine baked at 350 degrees for about 20 minutes.
See I told ya, I totally filled mine too full but hopefully you get the idea :)
Once they are cooled just frost....
And decorate... the kiddos and I used some pink sugar and heart sprinkles to complete our treats.
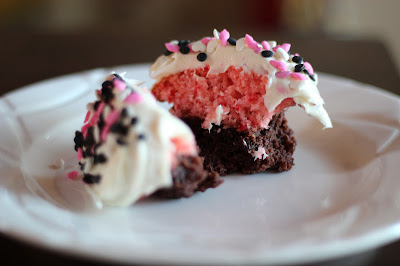
Not only are these super cute, check out the inside!!!!
Strawberry cake, brownie and cream cheese icing..... Yep they totally taste as good as they sound!
Pretty fancy for only about 30 minutes of work.
Happy Belated Valentine's Day!

Enjoy!  Lindsey :)

Sunday, February 12, 2012

Cookie Pops, Treats For My Little Valentines :)

Cake pops are so popular and they really are a fun treat for an event or special occasion, but they take some time which unfortunately is something I don't always have a lot of :)  So when I saw someone use the same idea with OREO's I thought I would give it a try.  The post I saw had no instructions so I totally winged this one and after an early stumble figured out a pretty good method I think :)
For these sweets on a stick you need Oreo's, lollipop sticks and chocolate.
Instead of melting the chocolate in a bowl, I've found that using a cup or glass works best.  The smaller size means you don't have to keep as much chocolate melted, but you still get the depth you need to totally cover the cookie.
While you are melting the chocolate in 30 second increments in the microwave, slowly insert your sticks into the center of the cookie.  I put the stick a little less than half-way into the filling while pressing the cookie from the top and bottom to keep the sandwich together.  If you push the stick too far it will separate the cookies.
Now carefully dip the cookie into your melted chocolate.  If you find that the chocolate is too thick you can add a little bit of vegetable oil to thin it out.  Just remember to never use water!!!  It will make the chocolate seize up.
You want to make sure that the entire cookie is covered, especially around the stick because once this hardens it will be the "glue" that holds everything together.  It helped me to use a spoon to evenly coat everything.
Next, I carefully added sprinkles and chocolates while the coating was still wet.  You could just do the chocolate, but since these are for Valentine's Day I thought I would make them extra special for my little sweeties :) 
After you've added the toppings you could just lay them on a piece of wax paper to harden, but I didn't want to mess up the sprinkles so I used a foam floral block from the dollar store as a drying station.  Through a little trial and error I found that until the chocolate hardens the weight of the cookie can cause it to slip off the stick, so putting them at an angle into the block seemed to help hold the cookie until everything dried.
This epic fail was my first one.  OOPS!!!  Hey you live you learn right??? I know there are many women out there who can whip up perfect looking creations without a glitch.. I am not one of those girls :)  So if you are like me hopefully this OOPS picture will be encouragement to get back on the horse!!! 
Because after a few tweaks, I made these just a few minutes later :)
These Cookie Pops are adorable, delicious and so quick!
You can wrap them with plastic and ribbon for a really cute gift anytime of the year.
But in my house there was no time for fancy packaging, 
they were devoured the very second they were ready :)
They were a HUGE hit! 

 Take five minutes and make these for the sweeties... big or little in your life... they'll love 'em!!!

Enjoy, Lindsey :)

Thursday, February 2, 2012

DIY Surf Spray = Beachy Waves Without the Salon Pricetag

I really like the look of wavy hair, but that easy, carefree like you just spent a relaxing day at the beach look usually comes at a price.  Since there is no white sandy beach or umbrella drink in my near future I totally have to fake it.  Thankfully there are several really great products out there that help you achieve this, but did you know they are mostly water and salt???
Crazy huh!?!  That costs almost NOTHING! So I experimented and this is what I came up with....
Take an old empty spray bottle from another product (like I did) or buy one, you can find them for about a buck at almost any store in the hair product or travel product section.
Mix about one cup of warm water, 1/4 cup of water based gel (if the first ingredient is water it's water based..I used cheap Suave men's that I found at Walmart because I liked the smell, but you can totally use some you already have or "borrow" some from your guy :).. and 2 tablespoons of Epsom Salt.  The warm water helps to dissolve the salt, but mix it really well to make sure it's combined .  Now just pour it into your spray bottle or bottles depending on the size and you are done.  
I give it a good shake before each use just to make sure it's well combined, spray it liberally onto damp hair, scrunch and that's it.  If you want it super wavy then follow with a little hair spray while your hair is still damp to set it all and then just let your hair air dry. That's it you are done!!!  Nice soft waves without the crunch or cost :)
Forgive the horrible self-portrait with no make-up and a ratty old t-shirt, but this spray works great for those days you just don't have the time or energy to worry about your hair, but don't want to look like a hot mess. For me that is everyday :) With two wild little ones to chase around, this spray is now the only thing helping my mop look half way acceptable! 

This cost about 30 cents to make and I LOVE IT!  Hope you do too!

Surfs Up, Lindsey :)
Wednesday, February 1, 2012

Micro Fiber Cleaner = 44 cents Saved My Furniture!


To say that our recliner "has seen better days" is a major understatement!!!  It was not an expensive piece of furniture when we bought it several years ago and we moved it cross country with us, but the
real kicker has been our little man.  Despite my better judgement, over the last year I have given in and to save the small amount of sanity I have left trying to wrestle two kids.. the occasional "yes you can eat your snack in there if you are careful"... turned into a daily routine. 
This is the result.  
And unless cracker crumbs, fruit snacks and juice stains are the big trend in interior design this season.... we are in big trouble!  
Or so I thought...... I just assumed that this chair was beyond repair and since it isn't anything that special I really wasn't that heart broke about it.. I figured we got our money's worth :)  But then a friend told me that rubbing alcohol may just save even this disaster.  So being a thrifty girl in training... I decided to give it a try!!!
All you need is good old rubbing alcohol (this cost a whopping 88 cents), a spray bottle and a rag.
Just put the alcohol into a spray bottle, but before you start use the attachment on your vacuum and give your furniture a good once over to get any loose dirt, dust and crumbs.  I am embarrassed to say that I'm confident I could have supplied a snack for an entire kindergarten class with the debris hidden in this chair.
 OK...now that the "big chunks" are gone... spray the area you want to clean.  For me that was pretty much the entire chair.
 Then use a rag to rub out the stain. I used an old white hand towel just to be safe in case any color transferred onto the fabric. Unlike soap and water, the alcohol evaporates quickly and doesn't leave a mark behind., but somehow manages to magically remove the stain.
 The rag quickly shows what I can hardly believe... it's working.  Gross... I know, but oddly satisfying :)  You may want to test a hidden spot on your furniture to make sure that the color isn't affected by this method.  For me it worked great with no problems!
If you notice spots where the fabric is matted at all from the rubbing, once it's dry lightly rub it with a clean cloth or with a bristled brush.
 I used about half of the small bottle of alcohol I bought, so for 44 cents I saved this chair!!!!
I am beyond pleased with the results.  It looks one million times better.  If you have a chair or couch that has seen better days thanks to kids or pets give this a try it will surprise you!!!!

Good Luck, Lindsey :)