Sunday, August 18, 2013

DIY Milk Crate Window Seat or Individual Stools


This blog started out as a crazy idea and has turned into such a fun part of my daily life.  Now, I'm always on the lookout for new projects, the problem is I am becoming a bit of a junk hoarder!  I'm always coming home with new "treasures", it's all contained in our three car garage so to the unsuspecting eye there appears to be no problem, but hit that garage door opener and my secret is out.  It looks like a thrift store exploded.   My poor husband is away working, so my need to rescue even more junk has gotten out of control.  

In an attempt to finally tackle some of these ideas before he gets home and commits me.. I'm forcing myself to finish all the projects I have before taking on any more (we'll see how long that last :).  And not only that I have to use the supplies I already have, which is plenty and rather embarrassing, I need to somehow get on a not allowed to enter list at Hobby Lobby, they do that at casinos right?? Why not craft stores???


OK, enough spilling my issues.  I found these old milk crates, two wood and one metal at my local antique store.  My original plan was to turn then on their sides and make a shelf/cubby for inside my front door, but the inside of these crates has metal dividers that made that idea too hard to accomplish without destroying the cool old crates so there they sat in my garage for months.  That is until I saw this tutorial to make a little ottoman.  I love the idea but I had three and really needed something for an empty spot in my living room under two large windows. 


So I thought pushing three together would make a cute window seat or bench. To get started I used some left over plywood my hubby had from building a shelf in his shop.  I cut three pieces as wide as the top of my crate, about 12 inches by 15.  Then I centered the board on top and used a marker to trace around the little metal feet to give me a guide of where to cut.


Now, with a drill make a hole inside that mark big enough to fit the blade of your jig saw and then cut out the curved triangle shape of the feet.  It took a few tries to get the tops to fit, but eventually they all fit flat against the tops of the crate then I used a palm sander to smooth out the edges of the board and rounded the corners.


Now for the cushion.  In the tutorial above, she used a piece of foam which is a great idea.  The problem is I didn't have any foam (remember the self imposed moratorium on supplies?) and foam is expensive, but I did have three old throw pillows and I wasn't using and some batting.


I tried to just keep the pillow intact and cover the board, but it felt to "mushroomy" or domed, and the batting made the corners too bulky.


So I ditched the batting and cut off the trim around the pillow removing the thick front of the pillow, laying the exposed filling flat on the top of the plywood, but leaving the tan back of the pillow to hide the white stuffing so you couldn't see it through the burlap.

Then with a staple gun staple on the covering of choice.  I used pieces of burlap from an old coffee sack, and some red and white ticking fabric for the other.  I'm no expert on upholstery, I just staple one side, then pull the opposite side smooth and tight and secure it, then turn and do the same with the other two sides. Finally, fold and staple the corners and cut off any excess fabric so the top will lay flat on the crate. 


I am really excited with how they turned out.  The kids think they are the "coolest stools ever" and not only do they fill the empty space and give us some extra seats/foot rests they also don't block the view of our pond that sits just out the window.


Blocking that view is what made filling the spot so difficult, but I think we found a solution.


And I didn't spend any additional money!!!  Huge Win!!!


But even if you had to buy the supplies this would still be a pretty inexpensive project.  Hope you like it!

Enjoy,


Friday, August 16, 2013

Easy No Sew Bow Workout Tank From Dollar Store Tees


I'm really, really, really trying to be more consistent about exercising, some days I manage to get it done, but not always so to motivate myself (hey bribery works for my toddlers) I thought why not make a few cute new workout shirts because you never know who might stumble into my garage and actually catch me working out.


I've seen a few of these cut out t-shirt tanks online so I though I would just grab some scissors and wing it!!! I found these two t-shirts at the dollars store, one pink and one really dark grey.  For $2 why not give it a whirl, plus who doesn't want to cut up a shirt, stress relief in an instant!


To get a general outline I used another exercise tank as a pattern. 


I did the same for the second t-shirt, saving the scrap material for later.


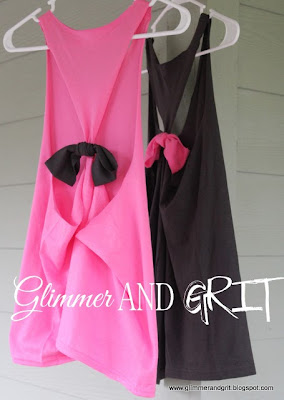
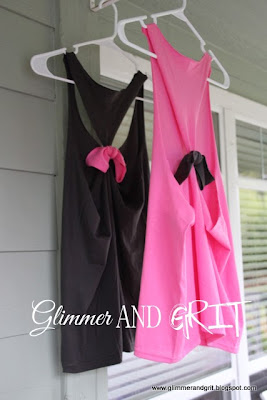
For the back I cut in towards the center from the bottom of each arm hole and then angled back to the top leaving a triangle section in the center.  Then cut just around the collar to remove the finished edge.  You can make that as deep or as modest as you want.


Now for the bow, take one of the sleeves and cut off the bottom hem and then make another cut about two inches up.


Now, move the side seems of the sleeve to the center and use the hem piece wrapped around the center like a rubber band to form the bow.


Next, use a small strip of left over sleeve and slip it through the center on the back of the bow.


Then, use that small strip to tie the bow to the bottom of the upside down triangle section you left in the back of the tank and finally snip off any excess.


I made two, borrowing a sleeve from the other color to make the contrasting bow.


These took just a few minutes, and only cost $2.


The pink version I kept the front and back necklines higher, and for the dark grey I cut out more of the t-shirt.


Since, the t-shirt won't unravel you don't have to sew anything.


But they are still super cute.  There is even plenty of left over material to make another bow or fabric flower to add to the front if you want.


Pretty cute, makes me almost want to exercise....


Tomorrow!! :)


So grab a $1 t-shirt, raid your closet or even better your husband's and make one today!


Enjoy,


Thursday, August 15, 2013

Easy Beginner Chunky Crochet Bow Toddler Scarf


Procrastinating is one of my many useless talents, and while perfecting my craft I saw a little girls scarf on Pinterest, the blog and tutorial (found here) are great but it was a knitting pattern and I don't knit heck I barely crochet... barely.  But I still thought it was too cute not to try so instead of exercising, cleaning or doing anything on my long to-do list I decided to make a scarf.  It has a bow, so I'm claiming insanity based on sheer cuteness! 


My great grandmother taught me a few crochet stitches when I was 10, but I hadn't picked up a hook since that summer until about a year ago, I won't date myself by admitting just how long that has been but it's safe to say it's been AWHILE!


So I watched a few you tube videos and made a few small things, but I've never tried a scarf.  I decided dipping my toe into those waters by making a small scarf for my favorite little diva.


And she loves it!!!


I don't know anything about crochet patterns so I just started experimenting.  I'm sure there are great patterns out there, but if you are a newbie like me and want to try something simple this is how I did it.. and trust me if I can make it ANYONE can.


For the scarf I chained 11, then turned and double crochet back through the chains, chaining one at the end before turning and double crocheting back the other way. I just went back and forth until I got the length I wanted for my little one, for her it was about 50 rows. Then I single crocheted around the entire edge to finish it off.  For the yarn a used a super soft chunk off white yarn (From Walmart) and a J hook.  For the bow I used a chunky grey yarn and the same hook.  To make that, you just make a rectangle and cinch the center together with yarn to form the bow.  For this bow I chained 15 (because I wanted it wider than the scarf) then turned and again double crocheted into each chain, chaining one at the end and continuing to make rows until I liked the size (5 rows) and then finished the edge all the way around with single crochets.


To attach the bow and hold the two sides together, I used the ends of the yarn I tied around the center of the bow and threaded them through the top scarf piece, then pulled those through a small button directly behind the bow.


Because the scarf is so chunky you don't even need a button hole, you just slip it through a stitch in the center of the bottom side of the scarf.


The yarn cost less than $6, pretty cute for a few dollars and a little tv time!


I can hardly wait for fall so my little munchkin can wear it!  We really need to get her to break out of her shell... haha!

  If you are looking for a cute, easy project this is a definite must try.

PS.. If you are a REAL crochet expert (unlike this super newbie) I welcome any advice :)

Enjoy,


Thursday, August 8, 2013

Old School Chalkboard Desk Makeover


I found this old school desk at a thrift store for a steal ($5) several months ago, it had been poorly painted and since rusted but it had great potential so of course I bought it and it has been sitting in my growing stash ever since.  I finally got around to fixing it up a few weeks ago and it turned out even better than I had planned... I love it when that happens!  Much better than the alternative, believe me those happen a lot too ;)


I did this project during a nap time, so in the need to rush before my little helpers woke up I didn't take pictures along the way but it was really simple. I wiped down the entire desk with TSP, a great cleaner that you find in the paint section. TSP cuts through grease and grime and is a great tool to use before painting any furniture. 

Next, I painted the entire desk including the top with spray primer, I used the reddish brown primer from Krylon instead of the white because red seems to take many coats to actually be red instead of pink when you use white.


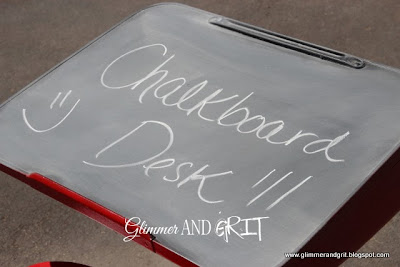
Then I spray painted everything in bright red, also from Krylon.  Two coats and then I taped off the top and sprayed two coats of spray chalkboard paint because who doesn't love chalkboard???  In my house, anything chalkboard is an instant hit!


Once everything is dry, remove the tape and season the chalkboard top.  To do that rub a piece of chalk across the entire top, up and down and then across.  


Finally, use your erasers to dust off the chalk and enjoy!


It turned out so cute, it makes me want to go back to school!


My plan was to put this in my little boys room, but it ended up being too big for the spot I had planned so I sold this little gem, and ended up fixing up a second old desk to match it.  It's always fun to make things for my family, but since I'm quickly filling every single available space in our house (much to my patient husbands dismay) it is fun to make things for others to enjoy too! I may have to do it a little more ;)

If you have an old desk, or see one don't hesitate to pick it up, with just a little time it could be a real gem too!!!

Enjoy,