Monday, November 28, 2011

Sweater Up-Cycle = Cowgirl Boot Socks!

I love the fall! The cool weather means out come the sweaters and boots and I couldn't be happier.  As I have said before I am totally obsessed with leg warmers for little girls and was probably secretly a little jealous that I too couldn't pull them off :) I'm afraid I'm a little old and probably about 30 years late for my "Flashdance Moment"... but then I saw boot socks and I became giddy!  It's basically just a "hint" of the leg warmer look, and I'm pretty sure for me it was love at first sight!  Determined to join the trend, on the cheap of course :)  I dug through my closet and found a couple great large sweaters I wore when I was pregnant and that were destined for donation... and within 20 minutes I was having my "moment" and hopefully not completely embarrassing my family! 
*** PLEASE forgive the white legs.  I think these "boot socks" look best layered over skinny jeans or leggings, but I wanted you to see what they look like alone. 
This is how I did it.
I folded my sweater in half with the arms together... and then cut through all four layers.  
The length depends on how tall you want them.  I've come to find out you can't really have them too long, because you scrunch them until they look right... so go long :)
Then I turned the arms inside out.. rolled up the bottom and zigzagged along the edge. If your sweater is too big, also sew down the side and cut off any excess.
I went around twice just to make sure the edges were sealed.  One tip with knit sweaters try not to pull too much because they will start to unravel, but if you cut and sew right away it's no big deal :)
Turn them right side out and TA-DA!!!  I told you they were easy :) I used pretty bulky sweaters, but you could use any weight.  These were so fun and easy I fully intend to make more with some thinner light weight sweaters very soon :)  I've also seen people add buttons and lace if you feel like taking it a step further
SO go ahead.. make some TODAY!  SO you too can put on your new "boot socks", slip into your favorite boots (maybe just leave the ripped "Flashdance" sweatshirt for another day :) and not only are you stylish, but super comfy! So go raid your closet or a thrift store for fun colored and textured sweaters, it's a quick inexpensive way to sport this fun trend.  Let me know what you come up with!

Good Luck, Lindsey :)

Wednesday, November 23, 2011

Cake-in-a-Jar!

When someone you love very much has to be away a lot, care packages become somewhat of a therapy session.  Thinking of things to put in them, buying/making those things and after week 35 being creative and original takes up a lot of your time.  But it's time well spent because it is the one thing your hands touch that your special someone can also touch and hopefully in turn feel how much you love and miss them.  Wow that's a lot of pressure on one little cardboard box, but it's how I feel and how I approach every week! Yeah, we have a close relationship with our post master.. he sees us OFTEN :)  SO long story short this post came out of one of those weeks early on when I was desperately looking for an idea.  My hubby's birthday was coming up and I wanted so bad to be able to make him a birthday cake, but with times zones and "bad guys" between us I had to come up with another way to get something special to him in one piece and edible.  This is what I came up with...
It started out as "birthday-cake-in-a-jar" but to my surprise was such a hit with my guy and his buddies... it's now just "cake-in-a-jar" sent as often as possible "just because" and I always make sure there are plenty to share!
There are many recipes out there to actually bake the cake in the mason jar, but I wanted all the frosting and goodies already together so my busy guy could just dive in with a spoon and have a ready made dessert and a little touch of home.  The requirements I had was it had to be able to keep for an extended period of time and seal tightly to try and stretch that as long as possible, plus it had to be sturdy to withstand shipping. If you are making these as a gift for someone that lives with you or near you.. you could add any fillings or things that required refridgeration.  But for me that wasn't the case so this is what I came up with and amazingly they make it to the other side of the world in tact and are still delicious. This is what I do.
I make a boxed cake mix (you could totally substitute homemade cake/icing recipes of your choice I'm just using some short cuts).  Once the cake is baked and cooled I use the ring of either the regular or wide mouth jar I'm using and cut circles out of the cake. 
After much trial and error this seems to work the best to get the jars filled to the edges. I also use a long spoon to really press down the cake and fill all the edges.  Now just start layering!
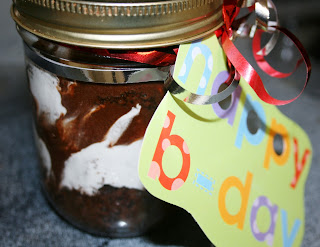
 This "combo" is this most popular request so far... chocolate cake, chocolate icing and marshmallow fluff (my take on a hostess cupcake). 
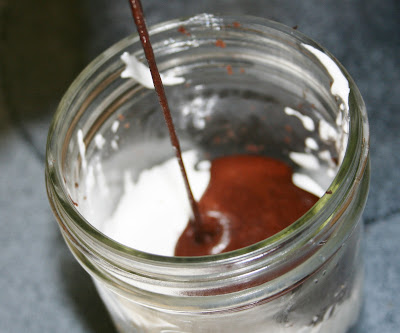
To get the marshmallow and icing into the jar easily I put each in a microwave safe bowl and warm them up a little until they are pourable or easier to drizzle.
I do the marshmallow....
then the icing..... now start with cake again and repeat your layers until your jar is full!
 I usually end with icing so it's like a real cake, then make sure the edge of the jar is wiped clean, put on the lid and ring and screw it down tight.
One cake mix should do 5-6 pint jars depending on how tight you pack them and how much extra "stuff" you put in.  I did three with the marshmallow and two with just chocoalte cake and chocolate icing.
I have tried:
*Chocolate Cake/Chocolate Icing/Peanut Butter (Reeses Peanut Butter Cup)
*White Cake/Chocolate Icing/Crumbled Oreo Cookies
*Red Velvet Cake/White Icing
*Chocolate Cake/Chocolate Icing/Crumbled Twix Bars
*Chocolate Cake/Chocolate Icing/Marshmallow Fluff/Crumbled Graham Crackers (S'mores)
*Chocolate Cake/Chocolate Icing/Marshmallow Fluff (Hostess Cupcake)
I usually put the "flavor" on the top with a label and then use a ribbon and attach a message and spoon to each jar. They look really cute and make great gifts for a birthday, special occasion or "just because" :)

****If you do mail your treats.. this is what I do and knock on wood they've made it perfectly every time! I take each jar and wrap it completely in bubble wrap and then seal it well in packing tape.  Then I stack them side by side in a bubble wrapped lined box and try to fill any extra space in the box with bubble wrap, grocery bags or newspaper.. anything to lessen the movement.  I've learned the tighter packed the boxes are the less things move and the more likely they are to get where they are intended in one piece.
So if you have a loved one down the street, across the state or in another time zone I hope you'll give these a try.  It's a great way to show someone they are loved and thought of even if you can't say it in person.  Let me know what you come up with!

Happy Baking, Lindsey

Tuesday, November 22, 2011

Homemade Cinnamon Honey Butter & Cornbread Gift Idea

Being the "carb addict" that I am.. when I saw a recipe on pinterest recently for Cinnnamon Honey Butter I couldn't help myself.. I made a double batch and put it on nearly everything in sight!  Thank goodness I made it before heading out of town and took it with me as gifts.. otherwise I may have eaten it all!  What am I talking about may?  HA.. I WOULD have eaten it all! And I'm not the only fan, it was such a hit my step sister asked me to make some for her and her husband to give as gifts to their clients. 
Then we decided it needed something to go with it, so I came up with the idea to add cornbread mix, cute labels and ribbon.  70 packages later, everything is sticky and my pants no longer fit from all the quality control :) , but I think they turned out cute and thought I would share in case you are looking for a good gift idea.
For the Cinnamon Honey Butter I doubled the recipe I found online and trust me it will not go to waste :)  This is what I did.
Cinnamon Honey Butter:
4 sticks room temperature butter
2 cups honey
2 cups powdered sugar
4 teaspoons cinnamon (or one tablespoon plus one teaspoon)
*** mix all ingedients until combined.
This whipped deliciousness is what you end up with.  This recipe should fill 5 1/2 pint jars. YUMMMM!
For the Cornbread Mix:
1 3/4 cups all purpose flour
1 1/3 cups cornmeal
2/3 cup sugar
3 tablespoons baking powder
3/4  teaspoon salt
This makes about 4 cups total.  1 1/2 cups makes one batch or about 6 muffins.  I wanted the bags really full so I doubled that and used 3 cups of the mix per bag so each person would be able to make one dozen muffins.
Finally I added a label with the directions to add 2 eggs, 2/3 cup milk and bake at 400 degrees for 15-20 minutes.  But if you want to make a small batch for yourself or smaller gifts, just use the 1.5 cups of mix and change the directions to one egg and 1/3 cup milk. 
I found these red gift bags at a party supply store and tied 'em all together with a christmas ribbon and a personal message.
These would be a fun hostess gift for a party OR just make the recipes and volunteer to bring bread to your next holiday dinner.  You'll wow everyone with this sweet concoction!

Enjoy, Lindsey

Monday, November 21, 2011

Fool Proof Homemade Crusty Bread.. Even This Fool Can Make :)

Not long ago the thought of ME making homemade bread was laughable! I assumed that only "really" domestically talented people made their own bread.  I was terrified of all the rising and watching and waiting.  It seemed like WAY too much work.  But being the carb addict that I am when a neighbor gave me this recipe and said, "You can't mess this up!" I decided to prove her wrong, attempt my first and last batch of homemade bread and be done with it..... BUT once again I was wrong.  I didn't ruin it!  It is soooo easy and tasty too.  So totally impress your next dinner guests with this great bread... and when they ask where you got this great artisan style bread say without hesitation... "Oh that.. I made today." like you do this kind of thing all the time :) Haha!  This is how you make it.
Add 1 1/2 tablespoons of yeast to 3 cups of luke warm water.
Next mix 7 cups of regular all purpose flour and 1 1/2 tablespoons of salt  in a large container.. I use a large square tupperware container (you want something with a lid). 
It will be a little sticky but get it all combined.
Next let it set on your counter for an hour or two.  My neighbor told me to set it in a sunny/warm spot in your kitchen with a damp kitchen towel over it.  But when I made this it was gloomy and it still turned out great.
Then just put the lid on and put it in your fridge overnight.... and it keeps like this for up to a week.  How great huh? You can make it ahead of a special dinner or just have it to use all week.
When you are ready to make some, take out whatever size chunk you want, fold it over itself into a nice ball and then set it in a skillet or baking dish sprayed or sprinkled with a little cornmeal.  Let it set while your oven pre-heats to 400 degrees.
Next fill a glass baking dish with water and put it and the bread in the over about 30 minutes.. until it is golden brown and the crust is hard to the touch.  The water makes all the difference so don't skip that part.
This is what you end up with.... crunchy crusty outside... delicious soft inside. 
Add a little garlic herb butter and you have the perfect fresh bread for any meal.  You can also add herbs or garlic to the dough, really the options are endless!  I will say because there are no preservatives it is best to make and eat it right away.  It's a great excuse to have one more piece... you wouldn't want to let it go to waste now would you??? And since you have more dough in the fridge.. you can make more tomorrow :)

Enjoy, Lindsey

Wednesday, November 16, 2011

DIY Sugar Scrub ~ Fun, Easy, Gift Idea

I just looked at the calendar and am no longer in denial I am in PANIC MODE!!!  It is almost Thanksgiving and have I NOTHING done for Christmas! Now don't let me fool you, for the first 20-some years of my life I was the person shopping on Christmas Eve and wrapping presents (poorly I might add) well into the wee hours.  But having both munchkins around the holidays forced me to change me evil ways and be more proactive.  So for the last few years I have been done shopping right after Thanksgiving... shocking I know!  This year however I have fallen off the "organization wagon" and have landed with a deafening thud!  Not one to wallow in self-pity... at least not for too long, I am trying to dig my way out of this pit.  To keep with this creative push I'm trying to stick to.. I really want to "make" a good portion of the things I give this year and when I cam across some DIY Sugar Scrub recipes I thought they might be fun to try.  I used to use one from Bath and Body Works years ago and instantly wanted to see if I could recreate it or at least something neat the girls in my life might like.  After checking out about a dozen sights and recipes and then giving it a whirl myself I came to a few conclusions.  First, why the heck didn't I try this years ago :) Next, all the measuring in these recipes is a big old waste of time!  And finally, who cares if I now have to sell a kidney to pay my hot water bill I have the silkiest skin around :)  So enough rambling.. this is how they turned out!
Cute huh? This is how I did it.
First you need some kind of container with an air-tight lid. I found these glass glass jars at the dollar store, but you could use mason jars or even plastic container as long as the top screws on tight.
The base is sugar and oil... from there the options are nearly endless :) For this one I used a half and half mixture of brown and white sugar.  But you could just use white sugar (which I did for a lemon scrub you'll see later).
 If you use the combo I would suggest mixing it in a bowl instead of your container just to make sure it combines.  As for the amount that just depends on the size of your jar... start with at least your container full of sugar because the oil compacts everything and will give you plenty of room later. You could mix it all in a bowl and transfer it when you are done, but I wanted to see just how much would fit. 
I then used a canning funnel and filled up my jar with the sugar mixture.  After making one I realized that it was hard to get the oil all the way to the bottom so hopefully you can see here, I put a little oil in the bottom first and that helped get it all combined a little easier.
Now it's time to add your oil.  You can use olive oil, but one recipe suggested sunflower oil because it had less of a scent so I gave it a try and it worked great.  It was right next to all the other oils at the store and was inexpensive.
I also tried Coconut Oil!  If you've never tried it this stuff is kind of amazing, you can cook with it, use it as a natural moisturizer among other things and it smells YUMMY!
The only issue is that it is solid.
So you have to heat it up.  Then just add it to the sugar.
How much is totally up to you.  I made some really wet with oil sitting on top... and some with much less. You at least want it to be similar to wet sand, that way it will exfoliate and moisture all at once.
My "little elf" was a big help with the mixing.
Even if he has no idea what "exfoliate" means :)
OK so this is what it looks like and you could end here... but why miss all the fun?
I decided honey and vitamin E were good for the skin so why not :) And I love vanilla, lemon and pomegranate so I decided to try those.. not all together of course!  I used about a teaspoon of vitamin E, a big squirt of Mr. Honey Bear, and a splash of the scent. Technical huh?  Just add some give it a sniff and play with it until you are happy :) 
 See told ya.. recipe-schmecipe :)
Then just a few drops of red food coloring for the pomegranate and yellow for the lemon to make the color really bright and festive!
See the lemon hand scrub I added more oil for a runnier consistency... it's totally up to you! They all work and smell AMAZING!
Finally I just printed off some labels that I made with the ingredients, directions and a message.
Tied it off with a ribbon.
And added either a coffee measuring spoon or scoop. These are a great gift to give anyone you think deserves a little pampering.  They smell amazing and in one use transformed my tired skin to smooth and soft even in the middle of a cold snap... you can't beat that!  This was fun, easy and didn't break the bank... hope my girls like it :)

Happy Scrubbing, Lindsey