Sunday, January 12, 2014

Kids Art Gallery Wall


HAPPY NEW YEAR!!!  I know I'm a little late, but hey better late than never right??? I hope this finds you happy and healthy and enjoying 2014.  The holidays were wild and crazy for us, just the way we like it, still somehow time got away from me, hence the lack of posts.  But, it's a new year, and with that comes a new dedication to blogging and finally getting caught up on posting all the projects I've been working on. So here goes nothing ;)

When I painted my piano (tutorial here), which was a fabulous messy blast I might add, I needed something to go above it and a kids art gallery seemed like the perfect fit.  It was an inexpensive way to fill a large space, it got the "treasures" off of my fridge and the kids are so proud... win, win, win! So here is the quick run down on how I did it.


For the sign I just grabbed a piece of old barn wood from my stash that fit the space, so I settled on this piece which was about 3 ft. long. I was lazy and didn't want to have to cut anything.  Working with the stencils I had on hand I used 4 inch letters for the top line, tracing the outline with a pencil and then used slightly smaller 3 inch stick on letters on the bottom. 


Then I traced along the edge of the bottom letters as well, removed them and then using a small paint brush and white paint filled in all the letters.  I like that the top line is a little bigger and a different font, but you can use whatever stencils you have.  Then I lightly sanded the letters to rough them up a bit and then rubbed a dark walnut stain on the entire board, even covering the letters and the outside edges of the wood. The stain works fast so just cover the area and rub it off with a rag, if you want it darker do it a second time but once should be enough.  I love how it aged the letter, giving the sign a quick rustic look.  I also added a little Annie Sloan dark wax, but that step is totally optional.  I use it on almost everything.


The frames I had picked up at a church yard sale for 50 cents a piece over the summer and stashed away in my garage.  I grabbed anything with an interesting detail, because once it's painted the frames look amazing.  So for this I grabbed a few in different shapes and sizes, took out the glass and backing and painted them.  To hang the "art" I just hot glued twine, which you can find in any hardware section or even the dollar store, to the back on most and used a metal clip glued to another to mix it up.


Now you need clothes pins to attach the papers to the twine.  I grabbed some of the miniature ones from the office section, which I love to use, but I didn't like how "new" they looked.  A great way to fix that is vinegar and steel wool.  I've had this old jar of the mix for months and have used it on all kinds of different wood, it's a great thing to keep on hand.  To make just fill a jar 3/4 full of vinegar and then throw in a hand full of steel wool, let it sit overnight so it can do its thing and then use it forever.  I just give it a good shake and then paint it on the wood. 


But, since these are so small I just dropped them in the jar, put the lid back on gave it a few shakes and then fished them back out to dry on a paper towel. It's doesn't take long to give them a great aged look.


Then just hang them up in a pattern that you like and you are done.


Having them over a yellow piano, never hurts either ;)


This was such an easy, inexpensive project and I really am thrilled with how it turned out.


I loved the detail in this small frame and wanted to use it, but I knew it would be too small for "art" so I found this great quote chalkboard image on Google and used it.  Messy is always more fun!


Even without my little ones masterpieces I love how the empty frames look.


Twine and clothes pins, in my world you can never go wrong with those two..


no matter which way you string them!


And here it is after the "artists" took creative control of their space!


They are so proud to show off their work to anyone and everyone who walks through the door.


Changing out their work is quick and easy so the "exhibit" never gets old!

Grab some old frames and make one today! I hope you enjoy it as much as we do!


Thursday, November 14, 2013

I Painted A Piano... YELLOW!!! With homemade chalk paint... check out the before and after tutorial


I know nothing about pianos which I realize is an odd way to start a tutorial about a piano, but to be completely honest and to prove my ideas sometimes do start out as certifiable craziness but somehow, most of the time they work out.. so here goes my confession, I've never owned a piano, in fact I can't play a single song, but when I saw a wood piano painted turquoise about a year ago I knew I "HAD TO HAVE ONE"!!! So I patiently watched the classifieds and craigslist, waited until my husband was overseas (haha), and then this summer I found one... for FREE on craigslist!!!


This old gal, I've named her "Penelope", works great, had recently been tuned and the previous owners whom I'd never met but happen to live just up the road from me, even delivered it all for free, but cosmetically "she" had seen better days.


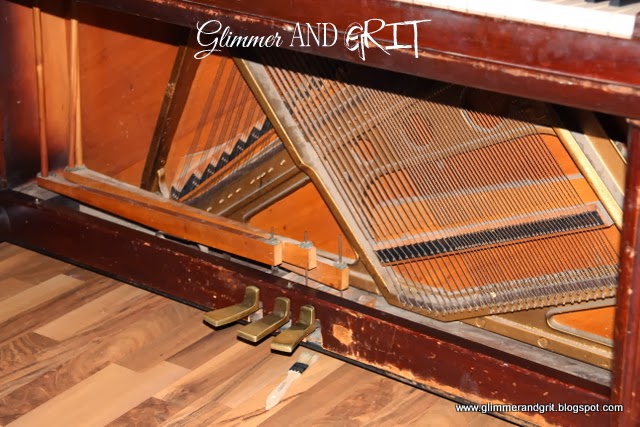
 A couple keys were stuck, the hinges on the top were broken, another piece covering the keys was no longer attached and the board above the foot pedals was missing.  But thanks to a you tube video on how to fix stuck keys (where would we be without you tube???), a piece of scrap wood, some sanding, wood fill, more sanding, lots of cleaning and paint... in 24 hours my piano went from junk....


... to a GEM!


Here it is with the broken pieces taken off and wood fill drying in the nooks and crannies that needed some repair.  That strange black hose in the corner is my trusty shop vac, it got a workout on this project! I did everything right where it sat in my house, which four big burly men placed there when they took it off the trailer, because I didn't want to mess with moving it.


Once the wood fill was dry and hardened, I carefully took out all the keys, lifting them out one at a time, keeping them in order on my guest bed to make putting everything back properly a little easier, because remember me and piano aren't acquainted!

 Next I used my shop vac to suck out ALL the dust, and debris that had fallen under the keys over the years.  I found $1.14 in change, 7 hair pins, lots of dust, lint and dirt and a matchbox car... no kidding I have no idea how it go tin there! I'm so glad I took the time to take the keys out and really clean it.  I knew this piano was a treasure, but never imagined all that would also come with the deal :)

And as a bonus having the keys out made painting really easy.  I know originally I said I wanted a turquoise piano and I do, but because of my furniture painting addiction my house is full and this would only fit in one spot on a wall near my dining room and turquoise just wouldn't work, so instead I went for this great yellow, which these pictures don't do justice... sorry about that.  The paint I got at Home Depot for $7 a gallon, it was a mis-tint that someone else didn't want... so I grabbed it! It's a great way to save money on paint if you aren't set on one color.. just ask at the paint counter next time you are there and see what mis-tints they have on hand you might get lucky.

If you have read any of my other blog posts you know I love Annie Sloan Wax, its AMAZING! I've recently stumbled across the most amazing antique store and Annie Sloan distributor in Olympia, Washington, Courtyard Antiques (link here) if you are ever in the Seattle area you have to stop in and check out all the amazing treasures!  The fabulously talented owner, Mary, has inspired me to finally take the plunge and work with the Annie Sloan paint, and I'm so excited.. so stay tuned.  

But this project I did before meeting her, and because I trying to save money anywhere I could, I made my own chalk paint by mixing one part plaster of paris with warm water until it dissolved and then mixed in three parts paint, stirred again to combine and painted away. The beauty of chalkpaint, no priming, just make sure the surface is wiped clean and paint!


While the first coat was drying I cut a piece of scrap wood we had from another project to fit the empty space in front of the foot pedals and then painted it as well.


After the second coat was dry, I put the keys back in and replaced all the now painted loose wood pieces.


TAH-DAH!!! My now fabulous yellow piano.  I can't wait for my kiddos to learn to play, they already love "playing" it.


The art gallery wall is in progress, but I couldn't wait to give you an sneak peak.  With the addition of some twine and clips, these recently painted empty frames from my stash will soon be the perfect spot for my kiddos art work.  Stay tuned for the tutorial!


But back to the piano, not too shabby for about a buck in paint.. well actually I did find that $1.14 in the keys so I guess I made 14 cents painting this puppy!!!


If you have an old piano or just have a burning desire like me to get one, don't be afraid to paint it and give it a new life.  This took me less than 24 hours, and even my husband, who wasn't in the car 15 seconds after getting off a plane before my 4 year old totally ratted me out... "Daddy guess what we got a piano!", good thing he likes it or just tolerates my crazy, either way... PHEW!


So instead of that hand me down being an eye sore, PAINT YOUR PIANO and you will be the envy of all your friends!

Enjoy,


Monday, November 11, 2013

No Sew Felt Play Tea Bag Tutorial


We got invited to a birthday party for a little friend recently and I found a great play tea set to give her, but I wanted to add a little special handmade something to go with it. I plan to do a tea set for my little munchkin for Christmas and I've been looking at sewn play tea bag ideas, but of course I procrastinated and waited until the last minute for this gift so I totally winged it and tried using felt and gluing them and it turned out so cute!!!


I made these all the same just for efficiency, but you could have fun and use all kinds of colors and combinations.  I decided to try to make something close to the look of a real tea bag, so I used cream felt for the bag, dark brown for the tea, red for the tag and heart and some cotton string and hot glue to hold it all together.

First using pinking sheers (you can absolutely use regular scissors but the sheers give the fun zigzags that really make these special) cut a long rectangle for the bag, a small rectangle for the tag and some small pieces for the tea.  The key to making these simple play tea bags I found is the combination of using thicker felt (the really thin stuff will show the glue) I bought mine by the sheet at Hobby Lobby for 25 cents and not using too much glue.

Fold the long rectangle in half and put a few pieces of the "tea" in the center, then put a thin line of glue along the three raw edges, quickly set one end of your string in the center and then press the edges together while it cools to make sure the sides seal together.  Finally fold the small rectangle in half around the other end of the string, lightly glue the edges and press until cool.  If you want, use some of the extra red felt to make a heart and glue it to the front. 


I made a dozen or so and put them in a simple paper box from Michael's, with a matching red felt heart glued on the lid.


These turned out so cute, I can hardly wait to make some more for my little "aristocrat" and have our first tea party ASAP :)


If you have a little tea party lover in your life or need a quick gift for one, this could not be easier.


So grab some felt and your glue gun and whip some of these up today!


Enjoy,


Monday, November 4, 2013

Reclaimed Wood Horseshoe Lucky Sign Tutorial


Anytime you can do something with a hunk of old wood, some paint and maybe an old horseshoe thrown in for good measure, I'm in! So when I asked my dad, a horse guy, for some old horseshoes I'm pretty sure he thought I had lost my mind yet again, but because he's used to my crazy ideas he got them for me no questions asked.. well maybe a few questions but long story short he got me the goods and I've been itching to use them ever since.  If you don't have a horse or know someone who does, call a local farrier (horseshoer) in the phone book, I'm sure they'll help you out. 

My first project with my new stash took only a few minutes and I love it, so the questions about my "NEED" for old horseshoes were well worth it! 


To make the sign I used a piece of old barn wood cut to fit the four large letter stencils and the shoe, this picture is actually of another sign I made on a piece of scrap wood because I was so excited about mine I forgot to take pictures.  These stencils are just inexpensive paper 4 inch stencils that you can find in any craft section. I love to use paint pens for stencils, but if you have a steady hand a small brush and any color paint you have will work great. I have a caffeine addiction to help facilitate my crafty endeavors and I have the shaky hands to prove it, so the pens are more my speed.


Once the letters were dry I brushed on a layer of this great weathered grey stain over the letters on the sides and back of the board then wiped off the excess.  It takes a little extra stain and effort to do the sides and back but I like everything I paint to look nice and finished from all sides.  I think you will be glad you took the few extra minutes now to do it.  


To finish it off I used sand paper and lightly rubbed over the painted letters, brushed on a little Annie Sloan dark wax to age the paint even more and then nailed on the horseshoe using long black carpet tacks.  After a long hunt in Home Depot for the perfect nail, the long carpet nail heads are flat, they look rustic fitting with the sign and they were long enough to go through the shoe and the board but narrow enough to fit in the small holes, just make sure you get the long ones. 


Ours is just leaned against the wall on top of a dresser, but a few tap-in claw hooks on the back would make this ready to hang anywhere.


If you do have to cut your board to fit, the stain on the ends also helps hide where the new wood is exposed and no one will know that you didn't just pull this wood off of a 100 year old barn as is.

It's a really cute, unique sign and we love it, and who couldn't use a little extra "Luck" around the house???

Enjoy,


Enjoy,

Sunday, November 3, 2013

Antique Painted Desk Re-Do


Once again, I really do feel like a broken record, I'm apologizing again for being a "bad blogger"! I'm so sorry for the lack of posts lately, my hubby surprised us and came home early from a long stretch overseas.. it was the best surprise ever, oh and he didn't have a heart attack when he saw the pile of treasures in our garage.. yet another miracle.  Then, I did my first vendor show and despite the paint on nearly everything I own it was a big success and I had a blast, but I worked for weeks getting ready and slacked on blogging.  SO stay tuned because I promise some fun tutorials are coming!

But, today I am keeping my end of a promise I made when I shared my new reclaimed wood barn light headboard (tutorial here), that I would also show you the desk next to it that really did go from junk to a jewel!!!  SO here goes! 


This is the rough diamond I scored at a thrift store this summer for $5.  Real wood, dove tailed drawers, lots of character but a few flaws.  One of the legs was broken, but in a drawer, a piece of trim was broken but also in a drawer, there was water damage on the top in the middle and two of the rounded leg bottoms had been squared off I'm guessing to fit into or out of its previous home.  Not afraid of a little work I brought this baby home, and then procrastinated for 5 months before finally tackling it one warm afternoon :)


First, I used wood glue to reattach the trim and let then tackled the water damage.  The top layer of wood was cracked and pulling away from the surface so using a scrapper (or putty knife, anything with a sharp edge) I scraped back any loose pieces.  Since the majority of he surface was still good I decided to leave it and try and fill in the gaps.


To do that I used wood fill, it is your friend in refinishing scratched, dinged and damaged wood furniture.  I like Elmer's but any brand will work, over fill the gaps so you have something to work with, let it dry and then sand until it is even and smooth. Then I used my trusty little jigsaw to square off the other two legs to match the two that had been cut, sanded and rough spots and wood glued the broken leg back in place.


After everything dust free was wiped clean, I love using my shop vac and baby wipes o do the job, then I sprayed the entire piece with flat black paint, used sand paper to distress the edges and finished with Annie Sloan clear and dark wax.  The finishing touch was the addition of the great knobs from Hobby Lobby (bought on a 50% off week) a little bit antique, a little bling, perfect for a girly touch to my side of the room.  Adding new knobs really is the best easy trick for updating a piece of furniture, especially if you get them on sale!


This super inexpensive project has been the perfect addition to our bedroom makeover and it serves two purposes, it's now my bedside table and my creative space to keep my computer and hopefully blog more often :)


The chair is actually one I showed you before (tutorial here) I had painted it blue, but once the desk was done it fit perfectly so I took off the seat and used the left over flat black paint from the desk to update the chair.  I love it when those kind of things just work out!  The idea for the wall piece over the desk came from Pinterest.


I found the huge raw wood frame at a thrift store for $2, painted it black then brushed on a light coat of red like the bed side table I did for the hubby's side (tutorial here) and the letters were purchased at Hobby Lobby also on a 50% off week and then using little nails I hung them right on the wall centered in the frame. The whole piece cost less than $20, not bad for something that covers a huge space!


The bedroom still needs some work, window covering are next on the list, but we really love our rustic western retreat! Hope you do too! Now, go rescue some "rough" treasure today and please let me know how it turns out!!!


Enjoy,