Wednesday, December 12, 2012

End Table Play Kitchen #2

It was just over a year ago that I finally acted on the crazy idea in my head (one of the many) to start a blog, I had no idea what I was doing or how to go about doing it, in fact I still really don't but I went for it and I'm so glad that I did.  

It's fun to look back at all the "projects" and see where the year has taken me.  I have paint on nearly everything I own, permanent scars on several fingers from my hot glue gun and hardly any room left in my house to fill with yet another wild idea... (but no fear I'll make room :) and I've LOVED every single second!

 So if this is your first time stopping by or if you've followed my craziness for awhile, thank you for your support and encouragement it keeps me going and wanting to try to new things.  Hearing from you makes every long day chasing kids followed by a late night blogging worth it!  I hope that these posts have been fun, inspired you to try a few of my wild ideas or at the very least given you chuckle at my expense. I'm really excited to see where the next year takes me and I hope you will come along for the ride!
That being said, this play kitchen project (tutorial here) is what really inspired the blog.  I had seen the idea online and began planning in my head how I would put my twist on it, but I needed some motivation so I convinced myself if it was for "my blog" I wouldn't procrastinate and might just actually get it done.  To my own surprise, I finished it, the kids LOVED it and they still play with it EVERY SINGLE DAY!!!  SO I guess I did OK :)
So in honor of the anniversary of my first BIG project I'm at it again, this time a smaller "end table" play kitchen for my niece for her 1st birthday.  I wanted to make her something special, but didn't want to force some big piece of furniture on her poor parents so I decided to try an end table this time instead of the entertainment cent and I love how it turned out!  So if you are wanting to tackle a smaller project or just don't have the space for a bigger play kitchen this one is for you!
I actually got this gem for FREE!!!  It was sitting alongside the road near my house with a sad "free" sign leaning against it so in true DIY/hoarder fashion I HAD to "rescue" it!
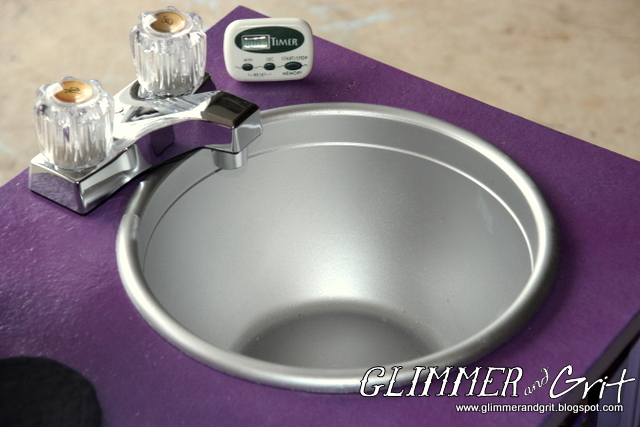
This time instead of a metal mixing bowl I tried a plastic bowl for the sink.
With a coat of primer and then this silver spray paint it went from an inexpensive bowl to a "sink" in a matter of minutes.
After I found that (with primer a big must) the bowl would work for the sink I traced the outline for it, the faucet and the placement for the stove knobs then used a drill to start the holes and a jigsaw to finish them.  As you can see it doesn't have to be perfect because the bowl and faucet will cover up any not so perfect edges, thank goodness precision is not really my specialty!
Next, I took both drawers out and removed the metal runners that hold them in place.  The bottom drawer is now the "oven" so I removed the front of the drawer and reattached it to the frame of the dresser with two hinges to make it possible to open and close the oven door.  Forgive the mess I'm a bit of a wild, messy crafter, but I did clean it out to paint, I promise!!!
See!!!  Isn't it cute!!!  
For the inside of the "oven" I painted everything black and added a touch light from the dollar store to the top to make it even more realistic.  A magnetic closure helps keep the door closed, and the hinges are tight so the door won't fall and pinch a little toe, but you can always add a chain with some cup hook for a little extra security. The muffin tin and baking sheet inside are also from the dollar store.
For this project I didn't bother priming or fixing the scratches and dings, just wiped it clean and started painting, but if your piece is a pressed board or laminate finish you probably want to add a quick coat of primer to help your paint stick.  The bottom of this is painted in lavender, and the top I painted one coat of a brighter purple and then lightly sprayed the lavender from about a foot away to give the top a splattered, marble finish and it turned out really cute. For the oven front I painted the center panel black and then reattached the old drawer pull after painting it with the bright purple.  The oven/stove knobs came off of an old oven at a recycle center that I glued to small pieces of wooden dowel and then after they were in the holes I put a few wraps of tape on the bottom of the dowel so that the knobs would turn but not come out.  
The burners are woven trivets from the Dollar Store that I painted black and glued to the top.  
I also used a tin from the dollar store and painted it with some left over lavender paint and added some silk flowers and rhinestones for some added frill, what girl doesn't want more frill???  And you guessed it, the plastic salt and pepper shakers are also from the dollar store but to spice them up I painted Mod Podge on the inside and then used while and black glitter to cover the inside of each and finished them off with an "S" and "P" sticker.
The faucet is a new bathroom faucet I bought at Walmart for $9, I love that it looks real.  And the timer is always a big hit.
On the left side I attached a silver tray from the dollar store that I painted with chalkboard paint.  I like anything that is dual purpose, this she can color on and have magnets for "shopping lists" or whatever she wants.
Under the "sink" or where the first drawer used to be I used a small tension rod to add a little ruffle curtain that I made with some scrap fabric.  This spot is perfect for a basket of play food, cups, plates and measuring cups.
On the right side I added a few silver hooks for a dish towel and some pot holders.
I'm really excited with how it turned out and her parents tell me the new little "chef" loves it, which is all that matters :)

Enjoy,

Friday, December 7, 2012

Old Entertainment Center Turned Costume Closet and Dress-Up Vanity

Dress up is such a fun thing for little kids and who am I kidding, it's fun for big kids too... I still like to play dress up!!! So for my little diva's 2nd birthday I wanted to make some kind of "dress-up" area.  I originally set out to use an old dresser and take out the drawers like I had seen on Pinterest, but I just couldn't seem to find the perfect one that was in my "project price range" (which is usually pretty small), then I stumbled across an entertainment center and totally changed my game plan.
This gem was $10 dollars at a new thrist store that just opened in my area and it must have been my lucky day because the entire store was 50 percent off, so it was a whopping $5!!!
It was dated, covered in dust, dirt and water stains plus the sliding doors in front were broken on one side, but for $5 bucks it seemed worth the challenge.
First, I took off the broken sliding doors and glass doors completely, I could just seem my kids slamming them and shattering the glass in about 5 minutes if not less!  Then after cleaning off all the gunk, I painted the entire piece with bright red spray paint.  Now for the add ons, I painted a wooden dowel with silver paint and then with screw in cups added it to the large "tv" area of the entertainment center.  For the "vanity" side I covered the back panel in red and white fabric just tacking down the edges with thumb tacks and then hung a cheap mirror to the back.
In case this ever isn't backed up against a wall I used a tension rod and some extra fabric to make a curtain to cover the opening in the back, you could also just staple or tack it up.. whatever you want.
For the "vanity" I used the same silver spray paint from the clothes rod to cover a lazy susan I picked up at a thrift store for 50 cents, the baskets are from the dollar store and are filled with cheap necklaces, bracelets and sunglasses.  Some of the accessories I had laying around, others I picked up at the dollar store, like the glasses they are just $1 reading glasses with the lenses popped out and the kids think they are so fun! And my favorite, the little crystal chandelier I got at a vintage fair last year for a few bucks with no idea what to do with it and now it has a perfect glamorous home!
For the front of the "dress-up" side I used another tension rod and some red and turquoise coordinating fabrics to make some quick ruffled curtains.  I plan to use the extra fabric to make my little one a rag quilt to help tie the whole room together, but that part of her red/turquoise room remodel with have to wait until after Christmas because this Mama is spent! 
But enough whining, the letters and stars are just thin wood pieces from Joann's that I painted silver and turquoise and glued on.  The theory behind the curtain is so that I could let them down and cover the chaos that is bound to happen about 46 seconds after she and her brother see this!
Same idea with the cupboard underneath, again just some plastic tub from the Dollar Store and some hats, purses and scarves that I already had along with any other small pieces from the costumes most of which I picked up the day after Halloween at Walmart for pennies.  Everything is 50-75 percent off so I bought wigs, capes, gloves, fairy wings, tutus, swords, pirate hats, army, witch, police and doctors costumes all for less than 40 bucks.
Here it is in her room!!!
And one more serene look before the kids are let in.....ahhh it's so cute and clean!
Uh oh they found it... that's the last time it will EVER look this organized!  But the goal was achieved, a dress up and vanity area that both a girly girl and brute boy would love!!!  They have not stopped playing with it!  
And little miss birthday girl LOVES her "vanity" the play make up and play lipstick were huge hits.  She sits in "her" chair and demands that anyone who enters sits down so she can "do" your make up :)
The chair and large mirror by the way were yard sale scores from this summer that I had tucked away.  The mirror got several coats of the same red spray paint as the entertainment center and the chair the hammered silver.  See my "hoarding" does come in handy, now if only I could convince my husband!
We really love how it turned out, it's crazy how the frustration of not finding a dresser actually turned into me creating something really unique that I like even more!
Enjoy,


Tuesday, December 4, 2012

DIY No Mess Play Makeup

As promised yesterday with the No Mess Play Lipstick, this is the rest of the No Mess Play Makeup that I made for my little diva!  Tired of all the mess from her never ending makeovers I was forced to find a better way.  I tried to give her an old MAC powder compact that was empty, but my smart little cookie was not fooled and immediately demanded one WITH makeup!  Really... I can't even fool a 2 year old, I'm in big trouble, aren't I??? So with a little help from some old compacts and nail polish the project has been a huge success.
Once the compact is completely cleaned and dried, pour in a layer of nail polish.  I say pour because you want a pretty thick layer to completely cover the bottom of the compact.  I used a gold color for the "powder".  Since the layer is thick it may take a bit to fully dry, so I let mine set out overnight with the lid open, this way it dries and the nail polish smell fades.  
For the "eye shadow" I did some fun pink, purple and sparkly colors in one compact.
And some bright pink and reds for the other.
Brushes are a must for any budding makeup artist, the longer handles are easier for little hands to use.  If you have some old ones laying around that works great, I love these e.l.f. brushes you can find them at Target or online at www.eyeslipsface.com they are $1 a piece.
She just got these last week and we have already had hours and hours of fun!  Not only does she like to do her own "makeup", she also really enjoys doing mine!!! So around here the two year old wielding the makeup brush and compact demanding, "Mommy sit, Mommy sit".... definitely RULES!

Enjoy,

Monday, December 3, 2012

DIY No Mess Play Lipstick

My little munchkin is a true "girly girl".  She LOVES pink, tries to put on ALL my jewelry at once and thinks she NEEDS makeup whenever I'm slapping it on.  Even though she is a whopping 2 years old now (ps. how did that happen?) her skills are a touch shaky!!!  Tired of removing lipstick from her forehead and the floor tiles I decided there had to be a better way so after scanning EVERY aisle in the craft store looking for a solution I came across what I think is the perfect fix!
Polymer Clay!!!  This non-toxic clay is around a dollar a package, comes in a bunch of colors, can be molded into whatever shape you want and once you bake it it becomes hard.  
If you have an old lipstick that is about at the end or one you don't use that will work perfect, but I just grabbed a $1 Wet'n Wild lipstick at the store and scooped out the lipstick.
I decided to save the lipstick in this little travel container to use for a homemade lipgloss project that is on my ever growing "To-Do" list, but that is totally up to you.  
To work with Polymer Clay, break off a piece and roll it around in your hands for a minute to two to get it nice and soft then form your tube.  I made mine about 1 1/2 inches long and about 1/2 an inch wide, you want it big enough to fit tightly in the end of the tube and just long enough that your little one can twist it up and down but still have a little sticking out.
Once you get the shape you like, put them on a piece of foil in your oven and back according to the package instructions, mine baked at 275 degrees for about 45 minutes.
Once they are cool...
use glue to secure the clay into the bottom of the tube!
You can leave the clay as is or use fingernail polish to add sparkle or color to your "lipstick" like I did to this one.  I really like "Piggy Paints" they are great non-toxic nail polishes for kids.
I left my tops smooth and rounded for easy application, but the shape is totally up to you.  My little diva LOVES these!!!  To say these were a success is a huge understatement!  They twist up and down just like the real thing, the colors are great and she thinks they are the real deal!!!
Stay tuned, because tomorrow I'll show you how to make the rest of the play makeup I made her for her birthday!!! 

Enjoy,