Sunday, February 3, 2013

Homemade Hashbrowns


Since my recent attempt at freezing avocados (tutorial here) was such a simple and successful project, I decided to roll the dice and yet again.. and I'm so glad I did!


My cute little local store where I bought the avocados for such a steal the other day also had a 10 pound bag of potatoes on sale for 89 cents!  Too good to pass up I bought a bag, but with my hubby out of town and me attempting to really give my all to my dive into the world of "CrossFit" workouts (my sore muscles are hating me, but that's for another post) potatoes unfortunately are not really my friends right now.  So not wanting to waste my great bargain like I usually do I decided to try freezing them.


There are a lot of great posts on the web that call for peeling, soaking and or boiling, I decided instead to take the easy route and just gave them all a good scrub and a few pokes to help them cook.


Then right onto the oven rack at 350 degrees.


Bake until they are soft, the time will depend on the size of your oven mine only took about 30 minutes.


Now let them cool, then grab a grater and shred away.  The beauty of being lazy and leaving the peels on is it gave me something to hold onto saving my fingers from the blades.  Plus, the potatoes basically peeled themselves because the flesh shredded easily and most of peel stayed in my hand.  


To keep your hashbrowns from becoming a potato brick in the freezer spread them in a thin layer on baking sheets and freeze for about an hour then transfer to freezer bags.  This gives the pieces a chance to start to freeze before being smashed into a bag.  If you skip this part, like I'm sure I would if I was reading this I can't imagine there would be a big problem you will probably just have to take them out of the freezer a little sooner to give them an extra chance to thaw before trying to work with them. 


We don't eat hashbrowns very often, but they sure are nice to have in the freezer when you have company or need to throw together a last minute meal.  For 89 cents, and barely any work I got three big gallon ziplock bags full of already cooked, ready to use potatoes.... not too shabby!  

So next time you see a great deal or have potatoes that are destined for the trash, heat up your oven, grab a box grater and save them... and the day!

Enjoy,

Tuesday, January 29, 2013

DIY Bed Sheet Ruffle Curtains


After making my little munchkin a Dress-Up Closet (tutorial here) for her birthday I ran into a bit of a problem... there was no more room in her room!!!  Since getting rid of something (my husband's idea) was NOT happening, I knew the only thing to do was improvise.  So I took the doors off her closet, moved the dresser inside and added a few cute baskets for shoes and accessories but it didn't look finished without curtains.  To keep this project under budget, but still chic I decide to attempt my first curtains.


I'm a very novice sewer so I took a little help from these super cheap sheet sets from Walmart. They are around 7 dollars a set and come with a flat sheet (for the curtain panel), a fitted sheet (for the ruffles), and a pillow case (for the tie backs).  I used one set for each side of the closet, so about 14 dollars total... not bad huh!?!


Since we are using the hemmed flat sheet as the base the only thing you really have to sew are the ruffles.  To make those I cut off the elastic border of the fitted sheet to make one large square of material and then along the top edge I cut one inch slits ever 6 inches or so, now is the fun part rip away!!!  You could cut them but I like the frayed edge and it was so fast.  It's a nice little stress reliever too!


Now ruffle all the torn pieces.  I just used a long loose stitch and then pulled the bobbin thread, if you have a ruffle foot for your sewing machine that would be perfect.  I on the other hand am lucky just to get the silly machine turned on, yet more proof that if I can make these you ABSOLUTELY can!


OK, once you've ruffled every scrap piece you can find, pin then to the finished flat sheet.  I just eyeballed it and evenly spaced them out in three rows.  Now sew them down to the panel with a stitch right down the center of the ruffle. Then, depending on how long you want your curtains fold over the top and sew along the top to create a channel for your tension rod.  Finally, repeat all of that for the other side.


And TA-DAH!!!  Pretty cute huh!?! I love that these are long and that even when gathered they pool a little on the floor. 


For the ties, I took a long piece from the pillow case or really any scrap you have left over and used a push pin to secure it just inside the closet frame.


This would also work great with sheets you already have on hand or you can always find them at the thrift store for super cheap.  I love the girly touch in my little divas room, and I especially love the price!

Enjoy,

Monday, January 28, 2013

Freezing Avocados

Avocados... I LOVE them, but hate the price.  You know what I hate more???  When I pay a dollar or more a piece for them and then let them go bad on my counter!  Ugghhh!!! I'm convinced the "avocado fairies" come to my house overnight and turn this incredible fruit (yeah totally pulled that fact out just to sound smart :) from rock hard to mush in a matter of hours.  Dang those "avocado fairies'!!!  If they have even made an appearance at your house I have the answer.... freeze them! Not the fairies, the avocados and yep, you can totally do that!
Even if you are better at keeping an eye on your avocados this is still a great trick.  The little store in my town recently had a special, 3 avocados for 99 cents!!! Amazing right?!? I wanted to take advantage of the great deal, but was afraid to stock up for fear those dang "fairies" would appear.  So I decided to try freezing them and it turned out amazing.  From now on I will always stock up when I see a great deal and will never waste them again.. or at least I'm going to try not to waste them.
To save your avocados from the trash in the nick of time all you have to do is scoop out the gorgeous green flesh, mash it up and add a little lemon juice to help keep the color.  I used nine avocados and a couple splashes (a few teaspoons) of lemon juice.
Now, fold over the edges of your freezer zip lock bag to make sure you keep the seal clean and scoop in your mashed avocado.
Carefully press out as much air as possible, seal it up and throw it in your freezer.
When you need avocado just pull one out and let it thaw in the fridge overnight (or if you are a horrible procrastinator like me thaw a bag in a bowl of warm water).  It tastes amazing and if you like to make homemade guacamole half the work is already done!  Here's to not letting those sneaky "fairies" win!

 Enjoy,


Wednesday, January 23, 2013

Kids Individual No Mess ART Bins


I threw these little ART bins together before Christmas really out of necessity.  I wanted to get the kiddos a bunch of fun new craft and coloring supplies for their stocking (psst.. don't tell them they didn't come from the BIG MAN with the red hat :) but knowing my wild little artists I knew they would be spread to every corner of my house within the first few minutes so containment was key! 


First, I stocked up on new markers, colored pencils, safety scissors, stickers, paints, papers and anything else that caught my eye at the dollar store and Walmart school supply aisle.


And since I try to avoid knock down drag out fights whenever possible, I bought two of everything.. one for each kid.  They know the other has the exact same thing so they stick to their own areas and shockingly now don't fight over colors.  I guess the thrill of robbing the other of a favorite color loses its luster when there's more than one. 


Now for the container.  These plastic bins worked out perfect, they cost under $4 (at Walmart), have lids, aren't too big and stack really easily.


So after buying two, in different colors to again avoid any confusion or cause for sibling war I used some letters and star stickers I had from another project to personalize each bin.


So simple, this took literally only a few minutes to throw together and they LOVE them! The kids ask every single day to use them.


Because of the shocking popularity of this simple project, I now keep them stacked in a low cupboard that the kids can easily get to.


My little artists get to create endless masterpieces and when they are done even at 2 and 4 they know everything has to go back in the bin.  The kids are happy and Mommy's happy, not bad for a quick excuse not to wrap a bunch of little Christmas presents :)

 Hope a little artist in your life likes these too!

Enjoy,

Monday, January 21, 2013

No Mess Kids Paint Project


It has been so gloomy and cold at our house lately, that going outside has been almost impossible.  
Translation... my kids are bouncing off the walls and I'm running out of ways to keep them entertained. 

 Thankfully, my kiddos love to color and do "projects" like Mommy, but on this particular day I couldn't muster the energy to even think about cleaning up the inevitable aftermath of real painting so I improvised with a gallon zip lock bag, some painters tape and extra acrylic paint from my stash.  The kids loved it, I was the hero and there was not a speck of paint to scrub off!!!  Win, win,win.


Oh, and did I mention it could not have been easier.  I got the idea from a preschool idea book that said to put colored blue in a zip lock to practice writing letter.  I loved that idea, but didn't have colored glue so I grabbed my box of cheap acrylic paints that I usually use to paint wood signs.  You could absolutely use finger paints, but these are less than a dollar and there are tons of colors. 


The kids loved getting to pick their very own colors.  Once that very serious process is complete, fold back the edges of the bag so you don't get paint in the seal and squirt in a little of each color.


Next, push out as much air as you can, seal the bag and tape it to a counter top or table with a little painters tape (it's sticky but won't harm your furniture).  I also put a sheet of white paper between the bag and the table because our table is very dark and I wanted the kids to be able to see their bright white "canvas" underneath.  


They mixed, and smeared and doodled, we even practiced a few letters while we were at it.


Little fingers work great as the "paint brushes", but I also gave each of the kiddos a brush to use as a pencil when they were practicing their letters.  We actually used the same bag for a few days and got lots of enjoyment out of them.  If your kids don't get tired of the colors, the sealed bag keeps the paints wet and allows you to keep using them for as long as you want... or until the weather warms up!

Enjoy,


Monday, January 14, 2013

Shabby Chic Coffee Table Update

Happy New Year!!!  I hope you all survived that holidays and have only amazing new memories to show for it!  I have many of those plus some really tight clothes thank to my lack of will power when it comes to Christmas goodies.  So as I kick off the year with new health and fitness goals to help shed those extra inches I decided now was as good a time as any for our coffee table to shed a few layers for a new look too.
This is our coffee table before.  It started out as a finished yourself wood table project that my husband and I took on for our very first house.  Come to think of it, this was probably my first ever DIY project, long before I even knew or cared what that was.  We sanded, stained and sealed it in our garage and loved it at the time.
But two kids and two moves later, the nicks, dings and crayon masterpieces that had left their marks needed to be updated.
So, here's one last look. Good bones, but bad acne!
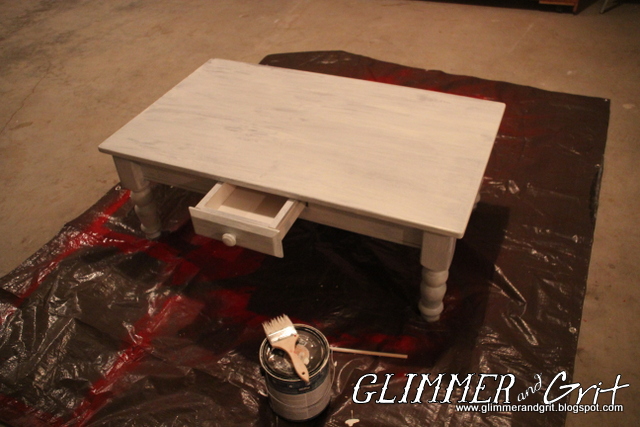
To make the change I decided on a distressed white washed look so I just grabbed some left over Moonlight White Behr paint I had on hand and a cheap brush and literally slapped on a few coats. I just wanted it mostly covered.
Once it was completely dry I used a combination of just a piece of sand paper and the more heavy duty electric sander to get a wide range of roughness to the finish.
I focused a lot on the corners and near the drawer where normal wear might happen.  I know it is crazy to cover scratches with paint only to scratch it up again, but after some Annie Sloan dark wax I LOVE how it turned out.
I will say if you are new to distressing there will probably be a point in the project where you question what you are doing and wonder if you just messed up all that painting, but go with it!  Keep sanding and roughing it up, because in my experience it always looks awful before it looks amazing :)
And here it is back in my living room.
I love the distressed finish with my other rustic western decor.
I hope you like it too.

Enjoy,