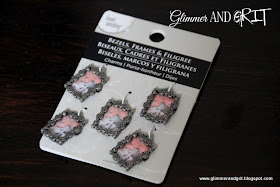
This summer I had the honor of being in my cousins wedding, she was a beautiful bride and it was a great day. I knew that I wanted make her a few special things for her big day, but I wasn't sure exactly what that would be, then while scouring pinterest trying to help with wedding ideas I came across a beautiful photo from a wedding where the bride honored a father who had passed away by having a tiny framed photo on her bouquet. I thought it was the sweetest way to remember someone and carry them with you without making other people sad or uncomfortable on such a happy day.
I found these tiny frames in the jewelry making section at Michael's, but how to get the photos that small??? After a little trial and a lot of error I figured it out! I'm sure there are other ways, but this worked really well and you don't have to have any fancy photo editing software.
I have photoshop, but it is way smarter than I am and I usually end up just using Picasa, a free photo editing program. You can download it for here for free, and it automatically transfers any photo you upload to your computer into Picasa for easy editing. From there you can quickly fix colors, crop, brighten and add a bunch of fun effects. We lost my grandmother several years ago, she was the most amazing shopping partner and grandma we were truly blessed, so when I came across this great old photo of her I knew that is the one I wanted to use.
Once you have the photo ready click print, when this pages pops up choose the wallet option in the top left corner under print layout and then go down to printer set up near the bottom left corner and click on it.
Now click on the tab that says page layout.
Then, click on the "By Percentage" circle and change the percentage to fit your frame.
This took a few tries, but for my frames reducing to 20 percent fit the frames perfectly.
Finally click print...
This is the 20% photo printed on regular 4x6 photo paper on my home printer. I used the photo insert that came in the frame as a guide to cut out my picture.
I made two one of our grandmother and one of her brother, so she could carry them both with her.
A little blue ribbon slipped though the loop on the frame gave her "something blue" and was an easy way to attach the frames to her gorgeous bouquet. I'm so happy with how it turned out and more importantly she loved it!!!
If you are looking for a way to honor a loved one at your wedding, this is a great option. Plus, you could also use this same idea to make a photo charm bracelet even if you aren't getting married :)
Enjoy,


No comments:
Post a Comment