Sunday, August 26, 2012

Dollar Store Chalkboard Placemat

I couldn't finish off my string of dollar store inspired "stuff" without making a little something for the kiddos!  In our house, chalk... especially colored chalk is a big favorite!  The Crib-Side Art Station I made last year is set up in our garage and it still gets played with almost everyday!!!  Considering I have two little ones under four and they both have the attention span of a nat... a year later and they still LOVE it, that's saying something :) So I thought having a small placemat version for inside could be a fun alternative that won't take up hardly any space in my junk drawer!  If you don't have one of these PLEASE tell me your secret because I can't live without my hidden disaster area filled with a little of everything :) 
I found these fun leopard print placemats at my local dollar store for you guessed it $1 each and I bought four, two for me and two I plan to give as a gift to a little friend wrapped up with some chalk and an eraser.
Since the vinyl side had such a fun print I decided to make these dual purpose, one side fun and the other function.  
So I left the leopard and instead painted the underside with spray chalkboard paint.  You can make your own chalkboard paint by mixing paint in your color choice with non-sanded grout which I love for bigger projects, but since these are small I wanted something quick and easy with no clean up so I just used the spray paint version.  I got my paint at Walmart, it's under $4 dollars for a can and it will be more than enough to do two coats on several placemats. 
Once the paint is completely dry, this won't take long, get some chalk because these are almost ready for your future artists to get to work.
Most chalkboard paint manufacturers recommends that you rub a piece of chalk (on its side works best) over the entire surface once to "season" it or get it ready.
Give the chalk a quick erase with a regular eraser or a damp cloth and that's it!
Fun and function!!!  Such a quick and easy project... just the way I like them :) 
And the result is really cute!  I love how well the bright colored chalk shows up.
My kiddos couldn't wait to try them out, big smiles mean big success in my house.
And there were plenty of those!
Oh and psst.... don't tell my kids or yours but this activity may actually induce a rare sighting.... sharing!!!!  I know it may seem unrealistic and these results may not happen in every home, but to my shock and awe it actually happened in ours at least for a few minutes so here's to sending you some sharing inducing, chalk filled fun too!

Enjoy,

Thursday, August 23, 2012

Old Cake Pan Tiered Tray

Day three of dollar store projects is in full swing, but I'm cheating a little.  To make this cute rustic tiered tray I did get a little help from the often overlooked kitchen section at my local thrift store, but I love the way it turned out.  I'm not sure exactly what I will store in it, but I think it would be cute as a jewelry holder, display in the kitchen or it may just may go on my new farmhouse table :)  The best part is it took just a few minutes to transform my two cake pans and a dollar store candlestick into something really unique.
The pans I picked up a few months ago during a sale at a local thrift store for 25 cents each, and the candlestick, just like the one I used for the "Crystal" Cake Stand (tutorial here) was of course a whopping $1. 
I decided on this great pale green from Krylon.  I bought this Pistachio for another project and since I had a little left over it was perfect for this.
Apply two quick coats of the spray paint then let it dry completely.
Now comes the connection.  E-6000 is magic!  OK maybe not magic but it will connect just about anything you want connected.  Put a thin layer along the top and bottom of the painted candlestick.
Now center the glue and candlestick inside the bottom pan then add the smaller pan on top and use a few cans to weigh everything down until it dries.
This is the finally product!
Only about $2.50 cents worth of supplies and the result is super charming.
This would work with any pans or tins, but I loved the dents and dings from these well used cake pans.  The character was included, no distressing necessary!

Enjoy,

Wednesday, August 22, 2012

DIY Dollar Store "Crystal" Cake Stand

Another day another dollar... dollar store project that is! I'm continuing my quest this week to make some
"stuff" that I absolutely NEED using dollar store finds.  OK need is obviously a strong way to describe my current state, but hey my theory is if it only costs a few bucks why not!  If you are still with me and understand my totally irrational reasoning... this fab "Crystal" Cake Stand cost $2, took 2 minutes and it looks worth way more!!!
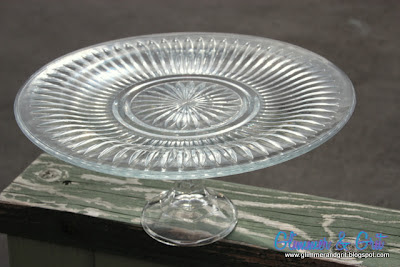
To make this "crystal" (aka glass with some pretty grooves, just don't look too close and tell yourself it came with a Waterford sticker ;) you need a glass dinner plate and a candlestick holder from the dollar store... grand total $2.
You also need some glue.  E-6000 is some potent stuff, you can get it at Walmart in the craft section near the Mod Podge and other glues, it costs a few dollars and will last you a very long time because a little goes a long way.  Just make sure you use it in a well ventilated area away from the kiddos.
Not only is this glue really strong once dried it also dries clear so you don't have to be perfect, just put a nice even thin layer of the glue around the rim of the candlestick holder. 
Now carefully center your plate over the glue and candlestick and then press down.  A can works great to hold everything in place until the glue dries. 
In just a short amount of time those two average pieces you've probably walked past in the item overload that you can experience while wandering the aisles of your local dollar store become something very pretty... if I do say so myself!  
Perfect for a party, special occasion or just because it's a day ending in "y" and you NEED a chocolate cake.  That happens to me quite often too :)
Who needs to go spend lots of money on a pretty cake plate when you could make several of these, some for you and friends and never break a sweat!  No one will ever believe that it only cost you $2.

Enjoy,


Monday, August 20, 2012

Dollar Store Doily Stenciled Stool

I hate to admit it but I have a rather odd fascination with the dollar store.  I don't go there often, but when I do I ALWAYS end up walking out with a basket full of things I don't need just because it was a buck!!!  I know that most of the stuff in there is junk and probably covered in lead based Chinese paint, but the smart marketing strategies of those stores totally works on this weak willed woman :)  I've even come across several bloggers that create some pretty impressive things using only dollar store materials so this week I am trying my hand with the frugal finds and this is the first thing I came up with.  My inspiration was a lace painted chair I saw on pinterest, I loved the idea of using the lace as a natural stencil but I thought there might be an even easier way to get a similar effect.. use paper doily's instead! 
Also, instead of a chair I decided to use this stool I already had.  I picked it up at a yard sale last year for $4 with the intention of fixing it up, but thanks to other projects and my ever present procrastination it has stayed in this shabby state ever since.  I use it at my sewing table and am glad it is finally getting a much needed makeover.
After wiping the stool clean I took three doily's.. two oval and one round and placed them around the seat in no particular order.  I just moved them around until I got the look I wanted and then folded the bottom half under a little making a slight crease to help them stay in place.
Now for the paint.  I chose a flat black for this project but any color would be fun.  I carefully used one hand to press down on the fold in the doily and then sprayed several light coats of paint over the paper until all the wood was covered.  Then I painted the legs of the chair as well. 
Next, carefully remove the doily while the paint is still wet.  Be sure to lift straight up so you don't smear or smudge the paint.
Next I used sandpaper to distress the seat.  Just run the paper along the edge of the seat and lightly across the top where it would naturally wear over time.
 
This not only gives the stool a great antique, lived in look but it will also help hide and spots where the paint was a little heavier than others.  If you've followed any of my projects you know I am always looking for ways to "hide" my inevitable uh-ohs and this works great!

This turned out so cute I don't know why you would waste lace, just use these great dollar store finds and toss them when you're done.  Plus for your dollar you get several so you'll have plenty left other for other projects.  

Hope you like it.


Thursday, August 16, 2012

DIY Dresser TV Stand

I was in desperate need of something to put our t.v. on so before the big move I went in search of an old dresser with some charm. 
This is the gem that I found for 15 dollars!!!  The dust and sticky gunk on the front were free :)
Since the top and bottom of the dresser had such interesting curves I decided to remove the middle drawers to make room for our DVD player and DVR.  Lucky for me this old clunker already had a board under those drawers so all I had to do was take off the runner and paint the entire inside of that second row of drawers.
I decided on a bright barn red chalk paint for a fun pop of color.
Then comes the wax!!!  This stuff is worth the money!  
I did a coat of the clear wax, distressed with sandpaper and then used the dark wax for an aged finish.
Finally some new knobs and a small hole drilled through the back panel for all the cords.
Now we are set up and we love it!  So much better than the pressed board things I've had to to put together in the past :)  Plus, the drawers are great for keeping all the kids movies and extra controllers organized.

Hope you like it!